
Page 28 - PP8inst
P. 28
Using the Relative Plumb Line 24
Using the AP Connected line and Posture Num-
ber Button
tm
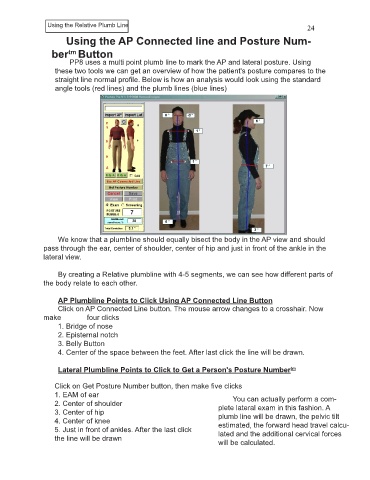
PP8 uses a multi point plumb line to mark the AP and lateral posture. Using
these two tools we can get an overview of how the patient's posture compares to the
straight line normal profile. Below is how an analysis would look using the standard
angle tools (red lines) and the plumb lines (blue lines)
We know that a plumbline should equally bisect the body in the AP view and should
pass through the ear, center of shoulder, center of hip and just in front of the ankle in the
lateral view.
By creating a Relative plumbline with 4-5 segments, we can see how different parts of
the body relate to each other.
AP Plumbline Points to Click Using AP Connected Line Button
Click on AP Connected Line button. The mouse arrow changes to a crosshair. Now
make four clicks
1. Bridge of nose
2. Episternal notch
3. Belly Button
4. Center of the space between the feet. After last click the line will be drawn.
Lateral Plumbline Points to Click to Get a Person's Posture Number tm
Click on Get Posture Number button, then make five clicks
1. EAM of ear You can actually perform a com-
2. Center of shoulder plete lateral exam in this fashion. A
3. Center of hip plumb line will be drawn, the pelvic tilt
4. Center of knee estimated, the forward head travel calcu-
5. Just in front of ankles. After the last click lated and the additional cervical forces
the line will be drawn
will be calculated.