
Page 49 - PP8inst
P. 49
Camera Tilt Compensator 45
Using the Camera Tilt Compensator
The Tilt Compensation Tool works by having an
item in the picture that is known to be plumb level.
In the picture on the right it is a piece of tape on the
wall that was placed with the help of a laser level. You
could also use a plumbline, or create a grid pattern on
the back of the wall. Anything that will show a vertical
plumbline in the picture.
Then, no matter how tilted the picture is, Posture
Pro can compensate for it.
Here's how it works:
Import posture picture into Posture Pro as you
normally would. Make sure there is something in the
picture that you know to be vertically level.
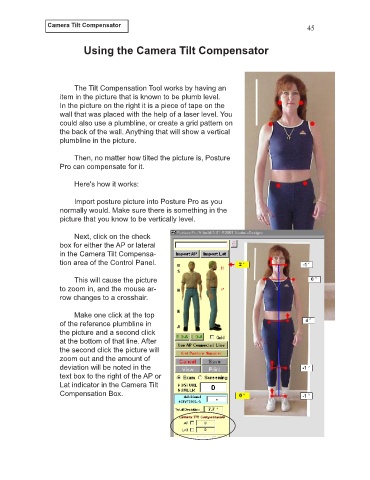
Next, click on the check
box for either the AP or lateral
in the Camera Tilt Compensa-
tion area of the Control Panel.
This will cause the picture
to zoom in, and the mouse ar-
row changes to a crosshair.
Make one click at the top
of the reference plumbline in
the picture and a second click
at the bottom of that line. After
the second click the picture will
zoom out and the amount of
deviation will be noted in the
text box to the right of the AP or
Lat indicator in the Camera Tilt
Compensation Box.